FS-CT6B Transmitter Configuration
How to install and get the PC software working for an Exceed FS-CT6B Transmitter. Turborix, Exceed are re-branded Flysky Transmitters so this install page works with all of those as well.
Install Cable Driver FIRST:
- Get your USB cable driver working first. Both the SILabs and Prolific drivers are contained in the T6Config download file below. SILabs is the driver currently shipping with the CT6B. You want to install the driver for the cable before plugging it in. If you don't know which one you have, you probably have an SILabs if it is a new purchase. Work on the USB cable install first, before moving on.
- Once you install the driver, it will appear in your Windows Device manager as a USB to Serial COM PORT.
- To view this you do click the following sequence :
- Start
- Control Panel
- System
- Click Hardware Tab
- Click Device manager
- Click the + next to PORTS
- There you will see an SILabs CP210 or Prolific USB to serial device. Note the COM PORT it is on.
- Note that T6config does NOT like any serial port ABOVE Port 9 (Digital Radio does not care). To change the port, within Device manager, Right Mouse Click the Prolific or SILabs USB to Serial port then select Properties. Now click Port Settings Tab and then the Advanced button. Change the COM port to a lower Number. It's ok if it says its being used on this list, but don't pick a port that is CURRENTLY in use within the Device manager Ports list. Some PCs will change the serial port if you plug into a different USB connection, Try to connect to the same USB connection on your PC or USB hub.
T6Config
Prior to shipping your T6 has been configured to the CPM Standard configuration that should be OK for the majority of RC Sailing uses. If you wish to change your configuration then proceed but I recommend you save this standard configuration so that you can come back to it if you wish.
- Install T6config.exe from the downloaded T6install.zip file. NOTE: T6Config does NOT work with Windows 7 64 bit in my efforts. (NOTE: Digital Radio is a much better alternative program that is free to try but $2 to buy. It's WORTH THE $2!!!! I have Digital Radio working on XP as well as a Windows 7 64 bit system)
- Plug in your cable and turn on Tx.
- Select your com port (a new com port would have been added during the driver install)
- Make sure it's communicating and click GETUSER BEFORE you make any changes.
- Save your settings to a default file so you can come back to it.
- Do not keep saving the same file name, you want to be able to revert back to a previous file if you mess something up. Name them incrementally Blueray1, Blueray2, etc.
- My default file is particular to MY Boat, Your Endpoints and Subtrims are likely to be different.
- If you have an Heli, change the TYPE to Heli 120 instead of ACRO
- MODE is your stick mode. USA uses Mode 2 typically.
Manuals:
T6 Radio manual link by FlySky
T6 Expanded manual written by user Jerry Shaw
Downloads:
T6config Install Files and drivers (Right click Save As) Note: view readme.txt file for driver installation
Current SILabs CP210 driver (6.3) for all Windows
Older SILabs CP210 XP, Vista, Windows 7 compatible driver (driver only) Note that these files are included in the T6Config Install files and driver link above
Windows 7 64 bit drivers for Prolific Cable only : If you have Windows 7 64 bit and your Prolific driver is NOT installing, try this driver instead. Uninistall the other Prolific driver, then install this. Note that T6config will not work with Windows 7 64 bit do go and download Digital Radio instead.
CT6A/CT6B HOW TO/FAQ page (NEW)
**** Alternative programs to T6config ********
ALTERNATIVE PC and MAC OSx PROGRAMs TO T6CONFIG
Some sample T6Config save files:
NOTE: You can import these into DIGITAL RADIO, When propted to select a file, for "files of type" :select All files (*.*)
Default T6config file for Blueray PE/SE (Right click Save As)
Genesis T6Config file (Right click Save As)
Generic 450 T6config file If your building your own 450 or other CCPM heli, you can Download and load this using T6config, then do the following:
Generic 4 channel Acro Plane (Right click Save AS) (Fixed wing airplane)
Text description Files
Default (Blueray 450) in Text format (to manually enter)
- Reverse CH1,2 and 6 as needed to get swash moving up/down correctly
- Change polarity (add - sign) to CH 1 or CH2 Swash AFR to make swash follow cyclic sticks.
- Level the swash using the trueblood method
- For more info on generic CCPM setup, click here
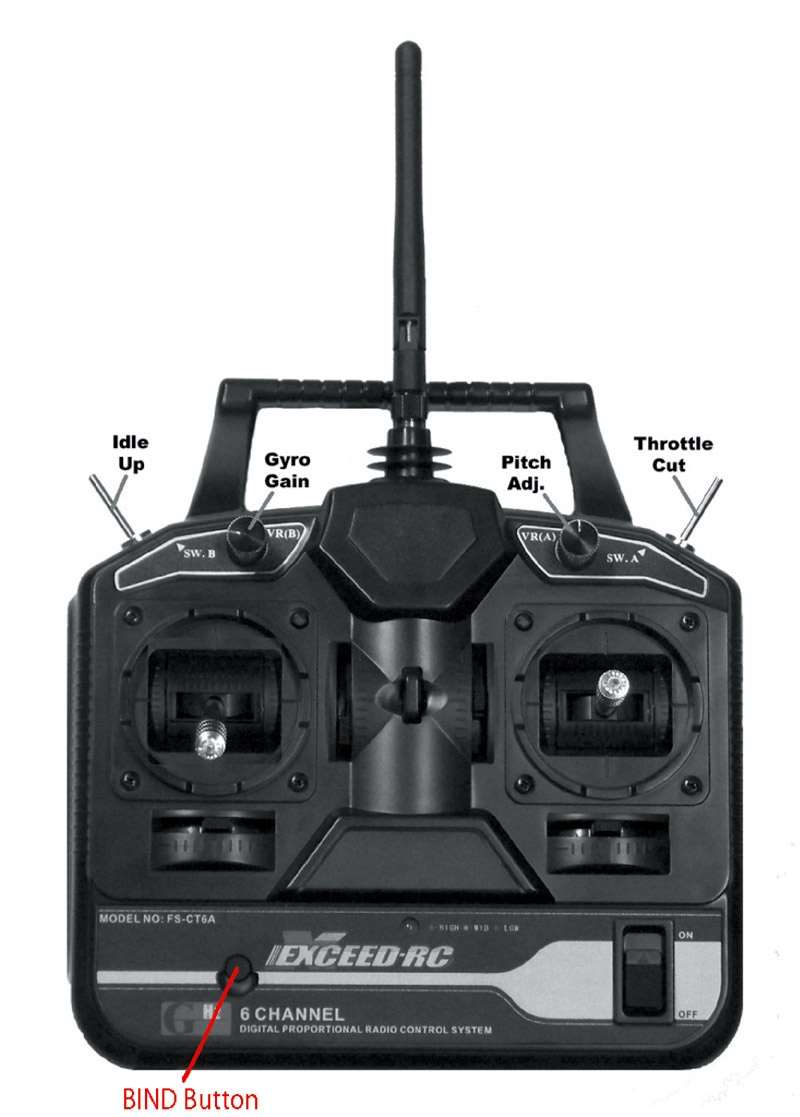
- Note that the knobs and switches will operate as per the operational video below
Info on the Power Meter LED
Voltage levels (tested by someone else) of the LED power indicator
LED steady green : SupplyVoltage > 10.8 Volt
LED steady orange: 9.4 Volt < SupplyVoltage < 10.4 Volt
LED steady red : SupplyVoltage < 9.1 Volt
It is ok to run NiMh batteries into the orange category but once it gets down to the red you should replace IMMEDIATLY!
If you are having trouble installing Drivers, try this:
- Prolific Driver site (try the Updated USB drivers above first)
- Vista Drivers Link at cooldrives (try the Updated USB drivers above first)
- If ser2pl.sys is missing DOWNLOAD HERE and place into C:\windows\system32 folder
- Google "Vista prolific driver"
- Google "SI Labs USB driver" and your operating system ("SI LABS USB DRIVER WINDOWS 7" for example)
RCGROUP THREAD
[RX Connection Drawing
Click image below to enlarge]
[Click image below to enlarge]